Custom Camera2D in Godot
A camera in a game can be understood as the framing through which you’re seeing the world. That’s a good way to think about what’s happening, but personally, it’s not the best mental model to use when thinking about and coding the transformations that will position the player, sprites, and user interface on the game window.
We can think about it as having two rectangles, one representing the game window and the other the game content. We want to translate and scale the game content rectangle so that it fills the game window. It’s the same idea as having an image fit or fill an area of the screen.
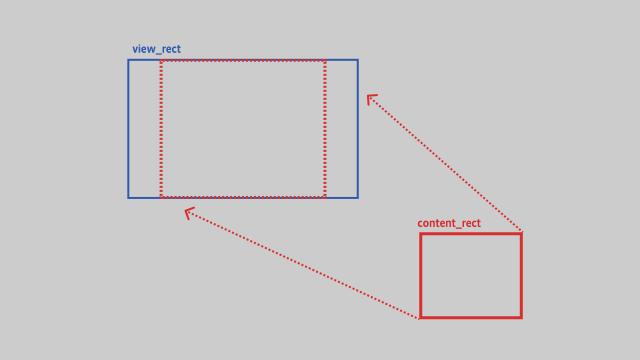
How do we transform the content rectangle (content_rect) to make it fit inside the view rectangle (view_rect)?
func get_transform_to_fit(
	content_rect: Rect2, view_rect: Rect2) -> Transform2D:
- First, we find how much we need to scale the
content_rectto have it fit inside theview_rect. We want it to fit inside without being stretched, so we use the minimum value from the axis of the difference between the rectangle sizes.
	var scale: Vector2 = view_rect.size / content_rect.size
	var min_scale: float = min(scale.x, scale.y)
	scale = Vector2(min_scale, min_scale)
- We now need to know how much to move
content_rectso that it gets positioned inside theview_rect. We start by taking the difference between the position of both rectangles so that after translation both are resting at the same position (which here is the top-left corner).
var translation: Vector2 = content_rect.position - view_rect.position
- Our rectangles may not have the same aspect ratio, and we want our
content_rectto be centered inside theview_rect. To do that, we calculate the scaled size of the content rectangle and add to the translation half of the difference between that size and theview_rect.size.
	var scaled_content_rect_size: Vector2 = content_rect.size * scale
	translation += (view_rect.size - scaled_content_rect_size) / 2
- To finish, we create and return a
Transform2Dthat uses that scale and translation.
	var transform = Transform2D(0, scale, 0, translation)
	return transform
How can we use that to write code that works like a custom Camera2D? Consider a level of a 2D platformer where we want the camera to follow the player. We need a rectangle that represents the game window and a rectangle to represent what part of the level we want to fit inside the game window. After we get that transformation, we can apply it to the whole level.
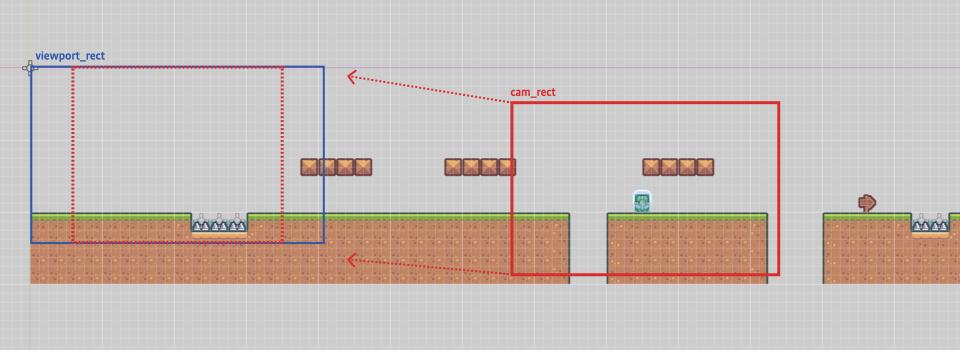
- We create a rectangle to represent what the camera is seeing, and get a reference to our player character. We can get a
Rect2representing the viewport by callingget_viewport_rect()from a class that extendsCanvasItem. We then center thecam_rectaround the player.
var cam_rect := Rect2(Vector2.ZERO, Vector2(854, 480))
@onready var player: Node2D = $Player

func apply_camera():
	var viewport_rect: Rect2 = get_viewport_rect()
	cam_rect.position = player.position - cam_rect.size / 2
- We use those two rectangles to calculate a transform that will make
cam_rectfit insideviewport_rect.
var cam_transform := get_transform_to_fit(cam_rect, viewport_rect)
- Where to apply that transform? We could apply it to a
Node2Dthat’s the parent of all nodes used in our level. The main problem with that is that collision shapes used in physics bodies won’t work as expected if they’re scaled. By applying our transform to a node that directly or indirectly has collision shapes nodes, we will be scaling them and breaking the physics of our game. An alternative is to apply it to theViewport.canvas_transform.
	var viewport = get_viewport()
	viewport.canvas_transform = cam_transform
The viewport canvas_transform is applied by the rendering server before the CanvasItem are drawn to the screen, it does not change the global position or scale of the nodes, and because of that does not affect the data used by the physics server.
That canvas_transform applies to all CanvasItem on the default canvas layer. So if you don’t want your UI to be scaled and moved around depending on the position of the player, or if you want a fixed background, you can put those as a child of a CanvasLayer. That will, behind the scenes, create a new canvas layer in the RenderingServer with its own canvas transform.
By directly controlling the position of our cam_rect, it opens the possibility to fine-tune how and when it moves around in relation to the player, or even multiple objects.